
Fitting Instructions-All
Models-Putting it Up
Try
erecting and taking down the tent once or twice to
familiarise yourself with it. It's quite simple to put it
up on your own but obviously helpful to have an assistant
to learn the ropes with you. It's much easier to put it up
the first time behind the vehicle, not on its own!
Please
see instruction manual supplied with your caranex tent.
If all else fails click here and
read
note 16 and then follow the step by step instructions.
General
Notes
- Adjusting to
cars with narrow roofs relative to height (smaller
Citroen, Peugeots and similar minis, vans like Rascals,
Hijets etc) achieve a snug fit to vehicle sides by
gathering sleeve material along the front hem together
over the vehicle roof. Tie a knot in the drawcord or fit
Caranex cordlocks on either side to limit respreading.
- Guy anchor
points. The front door jambs (the small pillars the door
locks to) are ideal for taking the drawcords to either
side. Push these well into the base; the locks will
still work. To dismantle, slip the drawcords off the
pillars so leaving them set at the correct length for
re-erection.
- Attaching sleeve
to vehicle. Once the drawcords are located either round
the door jambs or a more suitable anchor point if
applicable, remember to tie the ends back to the 'D'
rings on the front sleeve below the roof line. Attaching
them elsewhere rarely gives a correct fit.
- Fit around rear
bumper. The top of the elasticated front skirt should
face the side of the bumper and not under it. Some
vehicles have wide blades making it difficult to
minimise the gap around them. Self adhesive velcro can
be useful to cure this and any gap that defies
adjustment. Remember to 'firm up' the fit to the vehicle
with rear guys slack.
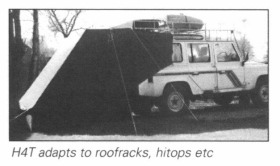
- Roofracks - H3's
& H4TL's. A H4TL will usually fit a vehicle that
would normally take an H3 but has an additional
roofrack, i.e. a Rascal with a full size rack etc. There
is also some 'give' in the design and an H4TL will fit
over many roofracks.
- Spare wheel
mounted on 4X4 rear door with wide swing. Move back roof
spacer and support poles to allow full opening against
awning side.
- Gap above skirt.
Ground clearance of 4X4's varies considerably. To reduce
any minor gap between skirt top and vehicle floor spread
groundsheet or rug from vehicle floor over skirt. To
lower skirt, cut and tuck down - use self adhesive
velcro to rejoin.
- Long wheelbase
vehicles. Extend length of front tie cords with spare
side-guy cord supplied. Additional cord available on
request or use Caranex Limpets with short guys.
- Roof drainage
channels. If necessary, block channel under front edge
of Caranex roof sleeve to restrain rainwater flow to
drainholes. (For older vehicles) temporary block with a
small ball of paper jammed into the channel - just
sufficient to divert flow forwards.
- Ventilation. An
adult loses a half pint of fluid in evaporation during
the night so adequate ventilation is essential to reduce
the risk of condensation which can be a problem in any
car or tent. A proprietary moisture absorber such as the
'Bison' is particularly helpful if you are sleeping with
a full compliment of people or pets. Leave car and
Caranex windows slightly open and the top of the door
slightly unzipped to give a through draught.
- Camping in high
winds. As with any tent, avoid exposed pitches. Site the
tent with its rear or the car - the sharp ends - into
the wind with the entrance in the lee or sheltered side.
Drive guy pegs in at 45 degrees. Used crossed, like
scissors, for anchorage in soft soil. use side guys in
rough conditions. Keep all guys tight and tentage taut,
particularly around the car roof. An additional pair of
vertical or slanting poles adds to rigidity. See below.
- Sleeping
arrangements. You may prefer to sleep in the back of
your car if there's space and it may be possible to
inflate an airbed 'in situ' in the rear and leave your
bed made up ready for the night. Cover it before
travelling with a waterproof groundsheet, put luggage
and camping gear on top ready for relocation in your
Caranex once erected. On a noisy site lower the rear
door to keep out the disturbance. Let some air in
through slightly open windows. Suitably positioned
towels or blankets, secured in closed doors or windows
give adequate privacy to the sides; a rug over front
seatbacks works well to the front. Use self adhesive
velcro patches to make a more permanent job. It pays to
keep kit to a minimum. A Camping Gas stove on a firm
base, about 1 ft square, for warming drinks and soup;
cereals, fruit, rolls, cheese, jam; paper towels or a
wash leather for clearing condensation from car windows
are useful.
- Dismantling and
Packing. Slacken and remove poles and unhitch rear guys.
Arrange tent material evenly within the area of the
integral groundsheet with the entrance zipper open and
the two sewn-in poles along either side of the
rectangle. Pull out groundsheet pegs. Fold either end
towards the centre - as far as the poles. Then fold the
sides around the poles into the centre. Finally , fold
over as necessary, pressing down on the material to
expel captured air, until compact enough to fit carrier
bag. If packed damp be sure to dry out thoroughly before
storing for any length of time when you return home.
Mildew is irreversible and reduces waterproofing very
quickly with any tent material, so be sure to dry it out
fully within at most 2 or 3 days.
- Cleaning and
Reproofing. To remove mud and 'natural' stains use water
without detergents which reduce the resistance to water
penetration. Do not use any cleaner unsuitable for
nylon. Domestic sewing machines and orthodox sewing
techniques may be used to repair the fabric. Every so
often spray the fabric and seams with aerosol
waterproofer (Grangers' Fabsil and Seam Seal are
recommended, available from us and Outdoor shops) to
maintain seal along the stitch work and renew general
waterproofing. Remember that sewn seams on all tents may
leak the first time they get wet then tighten up after
first drying out.
- FIRE
PRECAUTIONS: Caranex material is flame resistant but not
fire proof; as with any tent, do not allow a naked flame
near the fabric.
- CARANEX POLES. Your
caranex has three 2-piece poles - one roof spacer and
two roof supports - with a sewn-in pair as roof sides.
The shorter spacer clips between the centres of the
sewn-in pair to form an 'H' frame held up by the two
longer support poles. move the central roof spacer pole
rearwards to avoid high swing or hatch doors. The
freestanding kit (if supplied) has three short 2-piece
poles, one a spacer A between the feet of the support
poles, two tensioning the front guys at a slant - see .
An optional extra pole set adds freestanding rigidity
EITHER with extra roof spacer at C having moved central
one forward to E, allows a square rather than an 'H'
roof frame and, with extra support poles B, reinforce
the existing pair Or with vertical poles at each corner
- this also adds extra height to allow high swing doors
to open fully.
- Unroll Caranex with red label
to rear and front sleeve adjacent to the back of the
vehicle.
- Peg the two D rings (1a) at
either front corner of the integral groundsheet
immediately below the face of the rear bumper.
- Stretch and roughly peg out
the groundsheet at the rear D rings (1c)
- Offer up one side of the front
sleeve onto the car roof (2a) making sure its side wall
(2b) comes round the side of the car and the top of the
elasticated skirt (2c) is against, not under, the
bumper's face.
- Take one end of the front
drawcords to a door jamb (ie lock pedestal) suitable
anchor point or Caranex limpet*, then tie back to the
sleeve's lower front D ring (2e) with a temporary hitch.
Repeat on the other side. On narrow roofs (less than 5ft
wide) gather front edge of sleeve using knots or Caranex
cordlocks on the draw cord on either side to hold this
gathering in.
- Ideal for MPV with sliding
side doors and/or no convenient anchor points.
- From inside the draped
Caranex, fit the roof spacer pole (a short two-piece
pole with C clips at either end) either to the exposed
centre points (3d) of the twin sewn-in poles or anywhere
along their length to give the best fit for wide doors
and large spare wheels.
- Then clip one support pole
(long two-piece pole with Y clip at the top, capped at
foot), through the tape loop then either to the sewn in
pole just forward of the roof spacer pole or, if
preferred, to the end of the spacer. Push the lower end
of the leg into a front corner. Repeat with the other
vertical pole.
- Pull front sleeve well forward
as far as it will go, realign and tighten its front
drawcord to seal it to the vehicle roof to make sides of
front sleeve a close fit. A knot or tielock in the
drawcord on either side will help retain gathered hem.
Skirt end 3e-2c should be vertical viewed side on.
- Realign and peg down centre
and rear of groundsheet - the forward pair of pegs is
unnecessary when roof supports are in place.
- Finally peg out rear guys at
45 degrees and 1.5m (4ft) from rear corners. Tighten,
ensuring canvas is taut and secure. If this is done
earlier it is impossible to position the front sleeve
correctly on the vehicle roof and sides.
- Fit internal groundsheet with
feet of vertical legs resting on front corners. If using
extra groundsheet underneath on rocky or wet ground,
tuck in exposed sections, otherwise it will collect
water.
- The only difference in fitting
an H1, H3 or H4T series is in adjusting the height of
the front sleeve to various heights of vehicles. An H4T
series will adapt to most smaller vehicles; just tuck in
surplus sleeve on either side to gather tight to
bodysides.
- aller vehicles; just tuck in
surplus sleeve on either side to gather tight to
bodysides.
Long Term Freestanding
H1 and H3
- The most secure method for long term freestanding incorporates an extra pole set with two pole clamp hooks.
Long Term Freestanding
H4TL
- The most secure method for long term freestanding incorporates an extra pole set with two pole clamp hooks.
- If possible.
park with the awnings 'sharp end' into the wind.
- Before removing
the vehicle fit two additional support poles (from extra
pole set) to the front ends of the two sewn-in roof
poles.
- Reposition the
existing supports to vertical or near vertical to the
rear ends of the roof poles, forming a square of roof
poles.
- Feed a spacer
pole through the security screen's hem and clip across
the front of the front supports. Tie up with roof tapes
at ends. Hook plastic clips to screens side D rings and
press fit to the support poles; twist round to tighten
up screen between supports.
- Fix side guys
slanting forward from D rings on roof edges and remove
vehicle - baffle exhaust to reduce risk of soot on
skirt.
Either
Fold over one
side of sleeve, clamp its top edge to centre of front
spacer pole with pole hook.
Feed sleeve's
guy down through its lower D ring to a peg at the opposite
front corner and tie back to lower D ring. Likewise with
the other half of the sleeve, folding it over the other.
Pin down security screen with front groundsheet pins
either side of the support pole feet, covering the front
skirt. Tighten all guys.
Or
Roll back
side sleeves around front supports and clamp in place from
inside to keep them hidden from view.
H4TL for Vehicles with
Full Roofracks, Hi-roofs and Elevating Roofs
The central
roof section of an H4TL folds back to accommodate a
roofrack, hitop or elevating roof. Front sleeves tie to
the side of the roofrack, door jambs, guyed around the
front to the other sleeve or Caranex anchor limpets. With
the centre section forward and secured in place, use on
flat roofs for standard H4TL applications.
4x4s
and
vans with roofracks or roofbars have obvious anchor
points. Two Caranex accessories allow side or rear fitting
where there are none:
Multipurpose
Limpet Anchors
Ideal for
securing top panel onto the vehicle roof to bridge the gap
to the Caranex
Tips on use:
- Follow the
assembly guide to lay out and peg Caranex in position.
- Then separate
the velcro seams on either side of the central panel of
the front sleeve. Attach limpets to the guy at both its
front corners.
- Offer these up
onto or over the roof and anchor in a convenient
position for adjustment and eventual removal.
Take a look
at some testimonials from our Customers
and
Press page.